
The Jewelry Photography Setup That Actually Sells Products
The setup that produces sellable jewelry photos every time: a large diffused light source at roughly 45 degrees, a tripod, a macro-capable lens (or a phone’s macro mode with 2x optical zoom), a clean piece, and RAW capture with a locked custom white balance.
Before you buy anything or set up a single light, know the minimum kit:
- A camera or phone with a macro or “close-up” mode
- A tripod (non-negotiable for sharp macro work)
- One large diffused light source (light tent, softbox, or window light)
- A white sweep or backdrop
- A blower, soft brush, microfiber cloth, and museum putty
One habit separates clean product shots from constant retouching: clean the piece with a blower and soft brush before it ever touches the sweep, then handle it with cotton gloves afterward. At macro distances, a single fingerprint reads like a smear across the whole frame.
Key Takeaways
A repeatable jewelry photography setup built on diffused light, a tripod, macro optics, and locked camera settings produces consistent catalog-ready images with minimal retouching.
| Point | Details |
|---|---|
| Diffusion beats gear | Large, soft light sources matter more than camera body quality for flattering metal and stones. |
| Lock your settings | Shoot RAW at ISO 100, f/8 to f/16, with a custom white balance from a gray card. |
| Stack for depth | Use focus stacking with small manual focus increments to keep three-dimensional pieces sharp end to end. |
| Clean before every shot | Dust and prints invisible to the eye show up clearly at macro distances. |
| Practice on a trusted SKU | Providencewholesalejewelry’s sterling silver samples give a consistent baseline for testing your setup. |
Table of Contents
- Jewelry Photography Setup Equipment That’s Actually Worth Buying
- How Do You Light Jewelry So Metal and Gems Actually Pop?
- How Do You Stop Reflections From Ruining Jewelry Shots
- What Camera Settings Work Best for Jewelry Photography?
- Getting the Piece Ready Before You Shoot
- Building a Repeatable Shooting Workflow
- Editing Jewelry Photos Without Losing Accuracy
- A Quick Checklist for Batch Shoot Days
- What Wholesale Sellers Get Wrong About Product Photography
- Where to Find Pieces Worth Practicing On
- Sources
- FAQ
Jewelry Photography Setup Equipment That’s Actually Worth Buying
A sharp macro lens matters more than an expensive camera body. Diffusion and lens quality drive roughly 80% of the final image quality, while the camera body accounts for very little of it. A used or entry-level DSLR paired with a genuine macro lens will beat a flagship body with a kit lens every time you photograph a ring or earring post.
For lenses, a 100mm or 105mm macro lens with true 1:1 magnification is the standard choice among product photographers, since it lets you fill the frame with a small pendant without distortion. Budget shooters can get close with extension tubes or a reversed 50mm lens, though focus becomes trickier at short distances.
A modern phone works for many sellers, especially on Etsy or in a Shopify store where speed matters more than perfection. Handheld macro shots almost always show micro-blur that only becomes obvious once you zoom in on the listing.
A tripod with a remote release (or a phone’s self-timer) removes camera shake entirely. For flat-lay shots of bracelets or loose chains, a copy stand or an articulating arm holds the camera steady overhead.
On lighting, three options cover most budgets:
- Collapsible light tent or lightbox: cheapest, most forgiving for beginners
- Continuous LED panels: easy to preview, good for video too, but can run warm
- Speedlights with softboxes: more powerful and freezes motion, but adds a learning curve
Round out the kit with a blower, soft-bristle brush, microfiber cloths, museum putty for posing, and a few white and black cards for bouncing or blocking light.
How Do You Light Jewelry So Metal and Gems Actually Pop?
The priority in any lighting for jewelry photography setup is size, not power. A large, soft, neutral surface reflecting into the piece produces the smooth gradient highlights that make sterling silver and gold look expensive. A tiny bare light source, by contrast, throws harsh specular hotspots that read as cheap in a thumbnail.
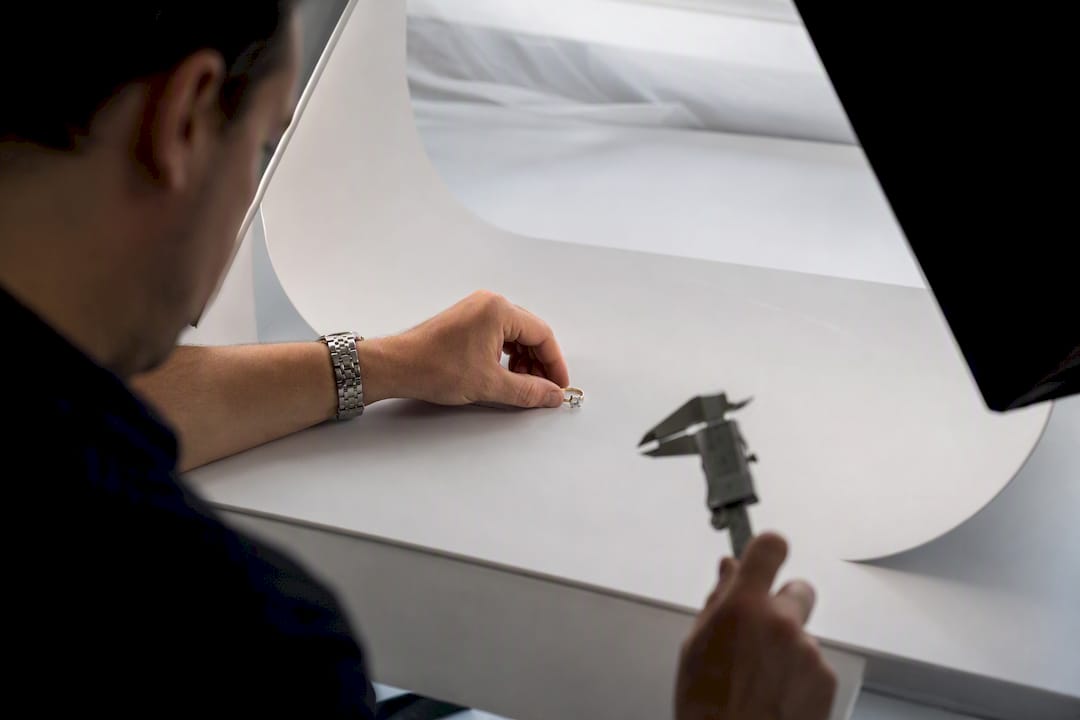
The most reliable setup uses two diffused lights positioned at roughly 45 degrees on either side of the piece, or a single light tent that wraps the subject in soft light from nearly every angle. Moving a light closer to the subject makes it act larger relative to the piece, which softens the highlight; pulling it back and adding diffusion fabric does the same thing at lower intensity.
Gemstones need a different touch than metal. GIA’s guidance on gem photography notes that faceted stones benefit from a small hard light or a snooted light added on top of the main diffused source, since it creates the internal sparkle and fire that a fully soft setup tends to flatten out. Star sapphires and other phenomenal stones need that accent light positioned precisely to reveal their characteristic reflections.
A practical build sequence:
- Set the main diffused light or light tent as your base exposure.
- Add a white card opposite the main light to bounce fill into shadow areas.
- If shooting faceted stones, add a small secondary light or a flashlight through a pinhole snoot aimed only at the stone.
- Check the histogram for blown highlights on metal edges and pull the light back if needed.
You don’t need studio strobes to pull this off. Foam core, poster board, and diffusion fabric from a fabric store produce results close to a professional studio when the control is right. Continuous lights are easier for beginners since you see the result in real time; strobes freeze motion better and run cooler over long sessions, but you’ll need a light meter or trial exposures to dial in color temperature consistently.
Pro Tip: Tape a strip of diffusion fabric across an open window and shoot beside it around midday. North-facing window light stays a consistent color temperature for hours, which beats fighting with mixed indoor bulbs.
How Do You Stop Reflections From Ruining Jewelry Shots
Reflective metal and polished stones pick up everything around them, including your camera, your hands, and the room itself. The fix follows one principle: diffuse the light first, then block whatever the piece still reflects that you don’t want to see.
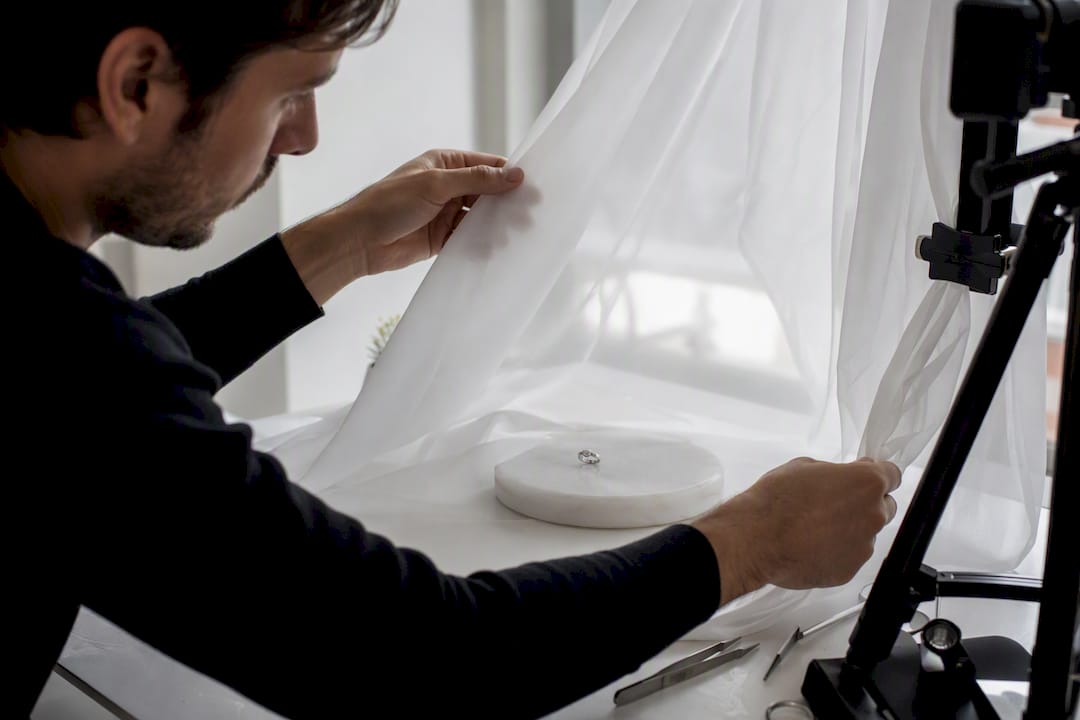
Start with a white sweep, a curved piece of white poster board or vinyl that runs from the backdrop into the foreground with no visible seam. Position the piece far enough forward on the sweep that shadows fall softly behind it, then check your camera’s histogram to confirm the background reads as pure white rather than gray. A common ecommerce workflow treats this sweep, cleaning, and 45 degree diffused lighting as the three non-negotiables of a repeatable setup.
Once the sweep is white, use black cards as flags just outside the frame to add contrast edges along curved metal. Without them, a smooth gold band can look flat and shapeless even under great light. A black card angled toward one side of a ring creates a dark line that defines its curve, the same trick jewelers use for hero shots.
- Diffuse first with a tent, softbox, or scrim
- Block unwanted reflections with black cards or flags just outside frame
- Bounce fill with white cards positioned opposite the main light
- Confirm background is pure white using the in-camera histogram, not just your eyes
Pure white backgrounds are the standard for Amazon and Etsy main listing images, so most sellers should default to a white sweep for primary shots. Darker or textured backgrounds, like slate, velvet, or brushed linen, work better for secondary lifestyle images or editorial content where you want the piece to feel curated rather than catalog-standard.
Pro Tip: If a ring keeps catching a reflection of your tripod legs, drape a white bedsheet loosely around the whole setup except for the lens opening. It kills stray reflections in minutes without buying anything.
What Camera Settings Work Best for Jewelry Photography?
Consistent, sharp jewelry photos come down to four settings you set once and barely touch again. Shoot RAW every time, since it preserves the color and exposure latitude you need for accurate metal tones during editing.
- Aperture: f/8 to f/16. This range balances enough depth of field to keep a ring’s band and stone sharp without falling into the softness that diffraction causes past f/16.
- ISO: 100. Since the camera is tripod mounted, there’s no reason to raise ISO and introduce noise into a macro shot where every grain shows.
- Shutter speed: as slow as needed on a tripod, or matched to flash sync speed if you’re using speedlights.
- White balance: set manually using a gray card rather than relying on auto white balance, which shifts between shots and makes a catalog look inconsistent.
This combination of RAW capture, low ISO, and a custom white balance is the core setting recommendation most product photographers converge on for accurate metal and gemstone color.
Focus technique depends on the piece. For flat items like pendants or medallions, a single autofocus point placed directly on the front-facing surface works fine. For anything with depth, a ring’s shank and stone, or a stack of bracelets, switch to manual focus and shift in small increments between frames, since a single shot at f/11 usually can’t hold both the front and back of a three-dimensional piece sharp. That’s when focus stacking becomes the standard fix rather than an optional extra.
Getting the Piece Ready Before You Shoot
Every fingerprint, dust particle, and micro-scratch invisible to the naked eye becomes obvious once you’re shooting at macro distances. Professionals keep a dedicated kit for this exact reason: a blower, a soft-bristle brush, and a microfiber cloth remove dust and prints before they turn into an hour of retouching later.
Run through this before every shoot:
- Blow off loose dust first, then use the soft brush on settings and crevices
- Wipe metal surfaces with a microfiber cloth; avoid paper towels, which leave micro-scratches
- Put on cotton gloves once the piece is clean and keep handling to a minimum
- Use museum putty to anchor rings upright on cones or risers
- Run fishing line through pendant bails to suspend them at a natural hanging angle
- Add slight tension to chains and bracelets so they don’t puddle unnaturally on the sweep
Props earn their place only when they reinforce your brand consistently across every listing. A small velvet riser or a signature stand can work well if you use the same one for every SKU. A random prop that changes from photo to photo makes a catalog look disorganized rather than curated, which matters more than any single “nice” shot. Pieces like a baroque pearl earring photograph well against a plain riser precisely because nothing competes with the pearl’s luster.
Building a Repeatable Shooting Workflow
Treat every shoot like a small production line, not a one-off photo session. Start with a single reference shot, check the histogram for blown highlights or crushed shadows, and lock both exposure and white balance before moving to the actual piece.
- Take a test shot of a gray card or a placeholder piece and confirm the histogram looks correct.
- Lock exposure and white balance so every subsequent shot in the session matches.
- For three-dimensional pieces, capture a focus-stack: keep aperture around f/8 to f/11, shift focus in small increments using the focus ring or the camera’s bracketing feature, and hold lighting and framing identical across every frame in the stack.
- Shoot your standard angle set per SKU: a hero shot straight on, a detail shot on the clasp or setting, a profile angle, and a lifestyle or worn shot if your catalog uses them.
- Mark tripod leg positions with tape so repositioning between SKUs takes seconds, not minutes.
That last step matters more than it sounds. A repeatable setup with marked positions and recorded settings saves hours across a batch shoot and keeps every product page looking like it came from the same catalog, which it should.
Pro Tip: Log your settings (aperture, focus increment count, light distance) in a notes app the first time you nail a shot for a given SKU type. Reusing that exact recipe for similar pieces cuts your setup time on the next batch by more than half.
Editing Jewelry Photos Without Losing Accuracy
Editing exists to correct what the camera couldn’t capture perfectly in one frame, not to reinvent the piece’s color or shape. The workflow runs in a fixed order: import the RAW files, confirm white balance against your gray card reference, adjust exposure, merge the focus stack, then retouch selectively.
- Merge the stack in Photoshop’s Auto-Blend Layers, Helicon Focus, or a similar dedicated stacking tool built for this exact task.
- Check color accuracy against the gray card shot and make sure your monitor is calibrated, since an uncalibrated screen makes silver look warmer or cooler than it actually is.
- Retouch dust and stray reflections using your reference shot as a guide for what’s actually dirt versus what’s a genuine design detail.
- Push the background to pure white, RGB 255, 255, 255, using a threshold or levels adjustment rather than guessing.
- Export to sRGB for web display, since most browsers and marketplaces don’t render Adobe RGB correctly.
Keep an eye on file size, too. Most ecommerce platforms load faster and rank better in on-site search when product images stay under 300KB, so export at a resolution that suits your platform’s zoom feature rather than the largest file your camera can produce.
A Quick Checklist for Batch Shoot Days
Every batch shoot follows the same rhythm, and shortcuts almost always cost more time later in retouching.
- Before the session: clean your sweep, set white balance with a gray card, and save a reference shot.
- Per piece: clean, place, adjust your cards, confirm focus, capture your angle set (and a focus stack if needed), then label the RAW files immediately with the SKU number.
- Time estimate: a straightforward piece like a stud earring or plain band typically takes a few minutes once your setup is dialed in; a detailed ring with multiple stones or a stacked bracelet takes longer for the focus stack alone.
- Before uploading: zoom to 100% on a few random frames to catch dust or focus misses before they go live on a listing.
File naming matters more than sellers expect. Something as simple as SKU number plus angle (e.g., “RG1042-hero.RAW”) keeps a growing catalog searchable instead of buried in generic filenames like “IMG_4021.”
What Wholesale Sellers Get Wrong About Product Photography
Most sellers treat photography as a one-time hurdle instead of a repeatable system, which is exactly backward for a catalog that grows every month. Consistent lighting and angles across a product line reduce returns, because buyers know what they’re actually getting instead of guessing from a flattering single shot. A ring photographed under harsh, undiffused light one week and soft studio light the next makes a whole storefront look unreliable, even if every piece is the same quality.
Providencewholesalejewelry’s sterling silver product lines get photographed with this exact discipline in mind, because a wholesale catalog lives or dies on whether a buyer can trust the tenth photo as much as the first. If you’re building out your own listings, pick one SKU and run it through the full checklist above before you touch the rest of your inventory. The setup either holds up across a batch or it doesn’t, and you’ll know within one session.
— Ronald
Where to Find Pieces Worth Practicing On
Testing a new lighting setup works best on a piece you already trust, not a one-off you’re unsure about photographing well. Providencewholesalejewelry stocks ready-to-shoot sterling silver pieces and sample sets that give you consistent metal and stone quality to practice against, without committing to a full inventory order first.
A sterling silver ring with AAAA grade cubic zirconia makes a solid test SKU, since it forces you to handle both polished metal reflections and stone sparkle in the same frame. If you sell sets rather than single pieces, a handcrafted sterling silver mesh bracelet, earring, and ring set lets you practice keeping lighting and framing consistent across multiple SKUs styled together. Order one sample piece, run it through the checklist from this article, and see how close you get to a listing-ready shot on the first try.
Sources
- JewelryShoot — Macro focus stacking for jewelry photography
- GIA — Gem photography guidance
- AcquireConvert — Jewelry photography for ecommerce (2026 guide)
FAQ
What Is the 2:1:1 Rule in Jewelry Photography?
There’s no single universally agreed definition of a “2:1:1 rule” in jewelry photography; the term isn’t a standard photography guideline. If you’ve seen it referenced elsewhere, it likely refers to a specific lighting ratio rather than an established industry standard.
What Do I Need for Jewelry Photography?
The core kit is a camera or phone with macro capability, a tripod, one large diffused light source, a white sweep, and basic cleaning tools like a blower and microfiber cloth. Everything beyond that, like a second light or focus-stacking gear, is an upgrade rather than a requirement.
What Is the 20/60/20 Rule in Photography?
This isn’t a standard, widely recognized rule in product or jewelry photography specifically; it’s more commonly associated with general composition or exposure discussions elsewhere, so treat any claimed definition with caution.
How Much Do Jewelry Photographers Make?
Earnings vary widely by market, experience, and whether the photographer works freelance or for a studio, and there’s no single reliable industry-wide figure to cite. Many small sellers avoid the question entirely by building their own repeatable setup in-house, which is the approach this article walks through.
Can I Use a Smartphone Instead of a DSLR?
A dedicated macro lens still edges out phone cameras on fine detail like pavé stones, but for most single-item listings, a phone setup is enough.
Recommended
- High Quality Rings for Men Unique Design Golden Full Crystal Business – Providence Wholesale Silver
- How to identify real silver jewelry: A buyer’s guide – Providence Wholesale Silver
- Silver Jewelry Hallmarking: What Buyers and Makers Need – Providence Wholesale Silver
- Handcrafted sterling silver mesh bracelet-earring-ring set – Providence Wholesale Silver